
FindingFive now supports mouse-tracking, which provides researchers with “continuous information about tentative commitments to multiple response alternatives over time” (Hehman, Stolier, & Freeman, 2015). This tutorial will introduce you to FindingFive’s mouse-tracking feature by walking you through a sample study. Click here to see a finished version!
Study Description
In our sample experiment, modeled after Dale et al. (2007), participants will be presented with animal words that are typical of their category (e.g., dog as mammal; congruent trials) or atypical of their category (e.g., whale as mammal; incongruent trials), then asked to select, from two possible category labels, the appropriate category for each word. In incongruent trials, competing labels will be presented alongside correct category labels. Animals atypical of their categories (e.g., whale) are expected to induce competition between the two labels, because they share properties with the incorrect category label (fish). This difficulty in categorization should be observable in terms of mouse movements; specifically, in incongruent, relative to congruent trials, participants’ mouse trajectories should more often deviate toward the incorrect category label.
Adding Stimuli
For the purpose of this demo, we will not go into detail on how to upload stimuli or build a study. Please see the crash course if you need a refresher on how to do so. To add stimuli for this demo, upload a .csv file with the following stimulus definitions:
| name | type | content | alignment |
| AtypicalTarget1 | text | Eel | center |
| AtypicalTarget2 | text | Whale | center |
| AtypicalTarget3 | text | Sea lion | center |
| AtypicalTarget4 | text | Penguin | center |
| AtypicalTarget5 | text | Butterfly | center |
| AtypicalTarget6 | text | Bat | center |
| TypicalTarget1 | text | Hawk | center |
| TypicalTarget2 | text | Dog | center |
| TypicalTarget3 | text | Horse | center |
| TypicalTarget4 | text | Shark | center |
| TypicalTarget5 | text | Alligator | center |
| TypicalTarget6 | text | Rabbit | center |
| Instructions | text | In this experiment, you will see a series of animal words presented on the screen. <p>Your task is to <b>select the appropriate category for each animal word.</b></p> | center |
| MouseInstructions | text | Click the button below and wait for an animal word to appear. <p>Once it appears, click on the appropriate category name for that animal.</p> | center |
Adding Responses
First, let’s set up the choice responses. Upload a .csv file of the following responses:
| name | type | choices | target |
| AtypicalResponse1 | choice | Fish, Reptile | Fish |
| AtypicalResponse2 | choice | Mammal, Fish | Mammal |
| AtypicalResponse3 | choice | Mammal, Fish | Mammal |
| AtypicalResponse4 | choice | Bird, Fish | Bird |
| AtypicalResponse5 | choice | Insect, Bird | Insect |
| AtypicalResponse6 | choice | Mammal, Bird | Mammal |
| TypicalResponse1 | choice | Bird, Reptile | Bird |
| TypicalResponse2 | choice | Mammal, Insect | Mammal |
| TypicalResponse3 | choice | Mammal, Bird | Mammal |
| TypicalResponse4 | choice | Fish, Mammal | Fish |
| TypicalResponse5 | choice | Reptile, Mammal | Reptile |
| TypicalResponse6 | choice | Mammal, Reptile | Mammal |
Setting mouse_position and mouse_reset response types
In addition to these responses, you will need to add a mouse_position response type, to indicate that mouse movements should be collected, and a mouse_reset response type, to reset the mouse before every trial. Let’s do that manually.
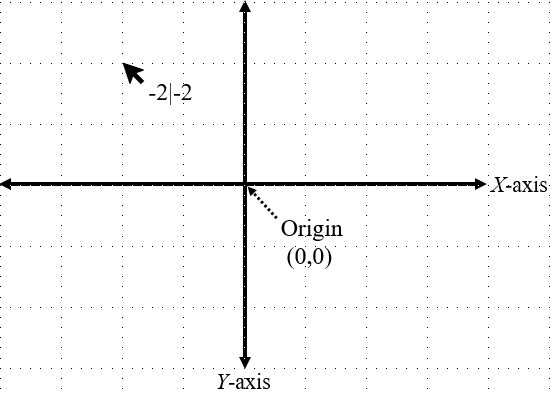
Add a new response and name it Mousetracking. Set the type property to “mouse_position”. In this experiment, we want 50 coordinates recorded per second, evenly spaced apart, so we will set the sampling rate to 50. You can also define the reference_point, which indicates the origin (0, 0 in X, Y coordinates) in the participant’s window. Recorded mouse coordinates will be defined in relation to the reference point. In our example, we will set the reference point to “center”. Notice how changing the reference point from the default “topleft” to “center” changes the recorded coordinates. When the origin is in the top left of the screen (left panel below), all recorded coordinates will be positive. But when the origin is in the center of the screen (right panel below), coordinates will be negative when the mouse is to the left of or above the center of the screen, and positive when it is to the right of or below the center of the screen.
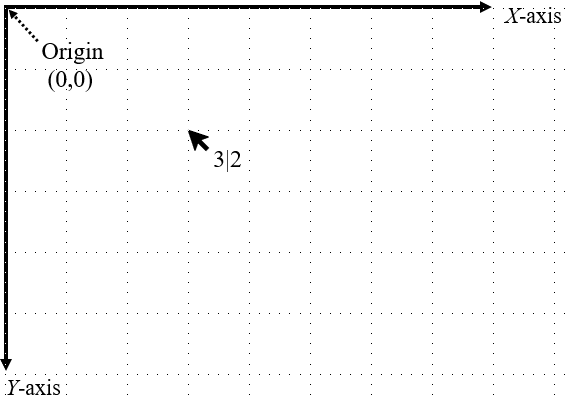
Left panel: Screen coordinates when reference_point is set to “topleft” (the default).
Right panel: Screen coordinates when reference_point is set to “center”.
Numbers next to each cursor icon represent recorded mouse coordinates in the form X|Y.
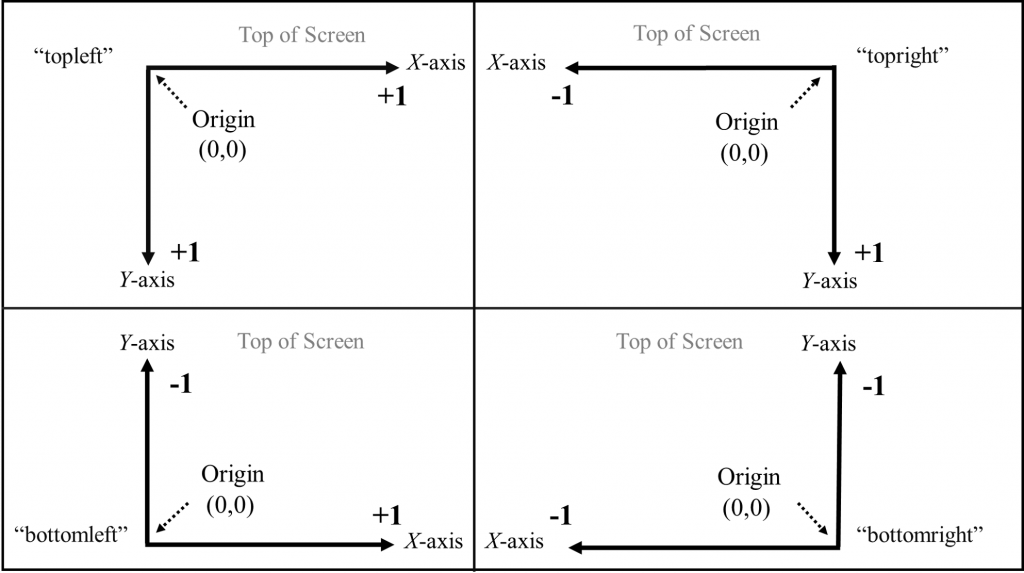
Finally, we will also set the proportional property to true to rescale the mouse coordinates so that they are proportional to the size of a participant’s browser window. As noted above, proportional mouse coordinates will also be defined in relation to the reference point. In this case, because the reference_point is at the center of the screen, recorded mouse coordinates will be between -0.5 and 0.5, because the mouse can travel a maximum distance of half of the browser window in all directions. Setting the reference_point to “topleft” will result in coordinates bounded between 0 and 1, because the mouse can travel the full distance of the window to the right or below the origin (top left panel in image below). Setting it to “bottomright” will result in coordinates between 0 and -1, because all movement will be to left of or above the origin (bottom right panel in image below). For “bottomleft”, the X coordinates will be from 0 to 1, and the Y coordinates will be from 0 to -1 (bottom left panel in image below). Finally, for “topright”, X coordinates will be from 0 to -1, and Y coordinates will be from 0 to 1 (top right panel in image below).
{
    "type": "mouse_position",
    "sampling_rate": 50,
    "reference_point": "center",
  	"proportional": true
}
Also add another response named MouseReset, with type set to “mouse_reset.” With this response type, you can choose to display either a button or a bullseye that turns into a button when hovered over. In either case, participants must click the button to advance the trial. In this demonstration study, we will not use the hover option, so we will not specify hover_required or hover_time (but see the Study Specification Grammar Documentation for more information). We will change the default button content from “CONTINUE” to “Click Here”. We will also set instruction to “” suppress the automatic instructions (which say “Click the “Click Here” button to advance”), since we already added custom instructions to our stimuli. You can also change the alignment of the button and instructions, but we will leave them at their defaults (center).
{
    "type": "mouse_reset",
    "button_content": "Click Here",
    "instruction": ""
}
Creating trial templates
First, let’s specify the instruction trial, like so:
  "Instr": {
    "type": "instruction",
    "stimuli": ["Instructions"],
    "duration": 10
  },
Next, let’s set up the trials. Since participants must choose between two alternatives, we will use the alternative forced choice (“AFC”) template. We include each target word in stimuli. In order to collect mouse-tracking information, Mousetracking must be specified as a response, along with the choice responses. Both types of responses should be separated by a comma and enclosed in brackets for each trial. While participants must select among the options provided in the choice responses, Mousetracking is a background response, meaning that it is passively collected and does not require a response. This trial template specifies 12 trials (6 with atypical animal words and 6 with typical animal words) with a 2 second delay before each trial.
  "Trials": {
    "type": "AFC",
    "stimuli": ["AtypicalTarget1","AtypicalTarget2","AtypicalTarget3", "AtypicalTarget4",
                "AtypicalTarget5", "AtypicalTarget6", "TypicalTarget1", "TypicalTarget2",
                "TypicalTarget3","TypicalTarget4","TypicalTarget5", "TypicalTarget6"],
    "delay": 2,
    "responses": [["AtypicalResponse1","Mousetracking"],
                  ["AtypicalResponse2","Mousetracking"],
                  ["AtypicalResponse3","Mousetracking"],
                  ["AtypicalResponse4","Mousetracking"],
                  ["AtypicalResponse5","Mousetracking"],
                  ["AtypicalResponse6","Mousetracking"],
                  ["TypicalResponse1","Mousetracking"],
                  ["TypicalResponse2","Mousetracking"],
                  ["TypicalResponse3","Mousetracking"],
                  ["TypicalResponse4","Mousetracking"],
                  ["TypicalResponse5","Mousetracking"],
                  ["TypicalResponse6","Mousetracking"]]
  },
In mouse-tracking studies, it is important to be able to reset the cursor position before the beginning of each trial. To do so, add a third trial template named ResetTemp and specify the type as “mouse_reset”, a built-in trial template designed specifically for this purpose. To avoid conflicts between trial stimuli and the mouse reset response location, when specifying the location of stimuli, we recommend using the custom rather than the simple option. Specify the stimulus name (“MouseInstructions”) and the location where this stimulus should be displayed (5, the center of a 3×3 grid; see Study Specification Grammar Documentation for more information) for each of the 12 trials. Since we want participants to have to click on a button to reset the mouse location before each trial, also add the MouseReset response.
  "ResetTemp": {
    "type": "mouse_reset",
    "stimuli": [{"which": ["MouseInstructions"], "location": [5]},
                {"which": ["MouseInstructions"], "location": [5]},
                {"which": ["MouseInstructions"], "location": [5]},
                {"which": ["MouseInstructions"], "location": [5]},
                {"which": ["MouseInstructions"], "location": [5]},
                {"which": ["MouseInstructions"], "location": [5]},
                {"which": ["MouseInstructions"], "location": [5]},
                {"which": ["MouseInstructions"], "location": [5]},
                {"which": ["MouseInstructions"], "location": [5]},
                {"which": ["MouseInstructions"], "location": [5]},
                {"which": ["MouseInstructions"], "location": [5]},
                {"which": ["MouseInstructions"], "location": [5]}],
    "responses": ["MouseReset"]
  }
However, note that, in this example, the custom option is used for the purpose of illustration, since the simple option will produce the same results. Also note that, if you use the simple option, you must still repeat “MouseInstructions” for each of the 12 trials, because we are using the alternate_random stimulus pattern (see note below).
All together, your trial templates should look like this:
{
  "Instr": {
    "type": "instruction",
    "stimuli": ["Instructions"],
    "duration": 10
  },

   "Trials": {
    "type": "AFC",
    "stimuli": ["AtypicalTarget1","AtypicalTarget2","AtypicalTarget3", "AtypicalTarget4",
                "AtypicalTarget5", "AtypicalTarget6", "TypicalTarget1", "TypicalTarget2",
                "TypicalTarget3","TypicalTarget4","TypicalTarget5", "TypicalTarget6"],
    "delay": 2,
    "responses": [["AtypicalResponse1","Mousetracking"],
                  ["AtypicalResponse2","Mousetracking"],
                  ["AtypicalResponse3","Mousetracking"],
                  ["AtypicalResponse4","Mousetracking"],
                  ["AtypicalResponse5","Mousetracking"],
                  ["AtypicalResponse6","Mousetracking"],
                  ["TypicalResponse1","Mousetracking"],
                  ["TypicalResponse2","Mousetracking"],
                  ["TypicalResponse3","Mousetracking"],
                  ["TypicalResponse4","Mousetracking"],
                  ["TypicalResponse5","Mousetracking"],
                  ["TypicalResponse6","Mousetracking"]]
  },

  "ResetTemp": {
    "type": "mouse_reset",
    "stimuli": [{"which": ["MouseInstructions"], "location": [5]},
                {"which": ["MouseInstructions"], "location": [5]},
                {"which": ["MouseInstructions"], "location": [5]},
                {"which": ["MouseInstructions"], "location": [5]},
                {"which": ["MouseInstructions"], "location": [5]},
                {"which": ["MouseInstructions"], "location": [5]},
                {"which": ["MouseInstructions"], "location": [5]},
                {"which": ["MouseInstructions"], "location": [5]},
                {"which": ["MouseInstructions"], "location": [5]},
                {"which": ["MouseInstructions"], "location": [5]},
                {"which": ["MouseInstructions"], "location": [5]},
                {"which": ["MouseInstructions"], "location": [5]}],
    "responses": ["MouseReset"]
  }
}
Defining the procedure
For this demonstration study, we will define a testing block only. Because we want the cursor location reset at the beginning of each trial, we will first specify “ResetTemp” then “Trials” as our trial_templates. For the pattern of presentation, we will select “alternate_random”, so that the two types of trials will be yoked together and presented in randomly-order pairs (for more information see the tutorial on randomizing paired trials).
{
    "type": "blocking",
    "blocks": {
      "TestBlock": {
        "trial_templates": ["ResetTemp", "Trials"],
        "pattern": {"order": "alternate_random", "repeat": 1},
        "cover_trials": ["Instr"]
      }
    },
    "block_sequence": ["TestBlock"]
}
Viewing the data
After you’ve run the study, when you download the data, the response_value column will contain information on the mouse position (in X|Y coordinates) at different time points throughout each trial, indicated by the response_rt column. So, in the example below, the mouse was at .15625|.02338 at 1300 milliseconds after the onset of trial 2, which was the last mouse-tracking response recorded before one of the options (Reptile) was selected.
For full documentation on the three key components of mouse-tracking, please see our grammar reference defining mouse_position response, mouse_reset response, and mouse_reset trial template.
If you have questions about this tutorial or about our mouse-tracking feature, please don’t hesitate to contact our researcher help team at researcher.help@findingfive.com.
References and further resources
Dale, R., Kehoe, C., & Spivey, M. J. (2007). Graded motor responses in the time course of categorizing atypical exemplars. Memory & Cognition, 35(1), 15-28.
Hehman, E., Stolier, R. M., & Freeman, J. B. (2015). Advanced mouse-tracking analytic techniques for enhancing psychological science. Group Processes & Intergroup Relations, 18(3), 384-401.
Stillman, P. E., Shen, X., & Ferguson, M. J. (2018). How mouse-tracking can advance social cognitive theory. Trends in Cognitive Sciences, 22(6), 531-543.