
Researchers can sign up for individual accounts on FindingFive, but sometimes it is more desirable to create a “lab account” so that participants can see which lab is recruiting them instead of the individual researchers. In addition, it is often easier to centralize participant reward payments and/or session fee invoices in a single lab account for management purposes. In this tutorial, we’ll show you three easy steps to achieve this “Lab Account” setup via the use of built-in collaboration features on FindingFive.
Step 1: Create a new researcher account using a “lab email”
To enable the ideal “Lab Account” setup, we need to first create a new researcher account using a lab email address. In some cases, your lab might already have a lab email address like mylab@abc.edu; if you don’t have one, just use a Gmail account like abcmylab@gmail.com.
Once created, you can split the name of your lab between the “First Name” field and the “Last Name” field of the researcher profile. For example, if your lab is called My Awesome Lab, you can put “My Awesome” as the first name, and “Lab” as the last name, like this:
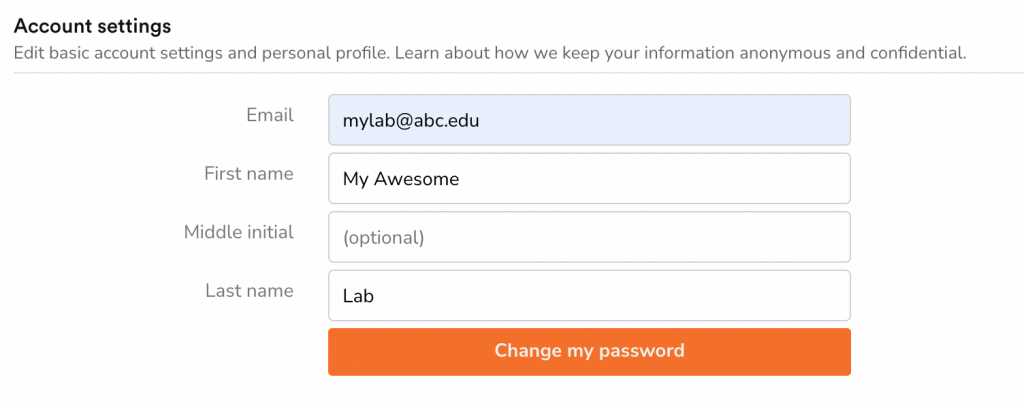
Make sure you also enter the name of the institution. For example, “ABC University”, in our fictitious example here:

Save the changes, and you are done with the first step!
Step 1.1 (optional): Sign up for a researcher account for yourself as well
OK. We lied about “only three steps”, sorry! But sub-steps don’t really count, right? In any case, if you are completely new to FindingFive and don’t have a researcher account for yourself yet, you should get one now. It’ll be necessary for setting up studies later to avoid editing conflicts.
Step 2: Add or transfer studies to the new Lab Account
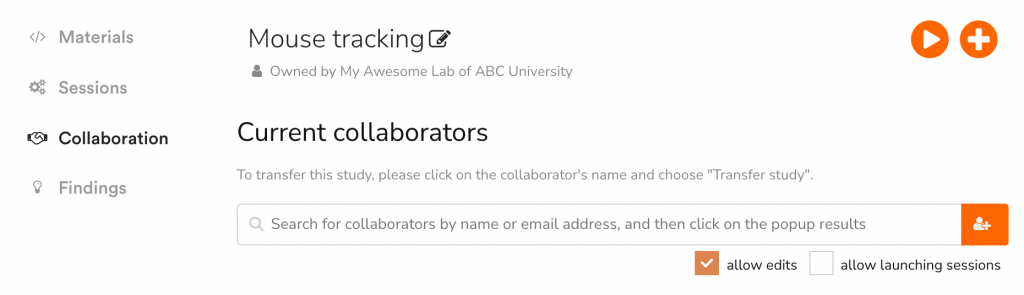
If you are completely new to FindingFive, you can now sign in to the newly created “Lab Account” and start creating new studies. Once the studies are created on the Lab Account, do not edit it there directly (see here for why this is a bad idea). Instead, add yourself (that is, your own individual researcher account) as a collaborator with editing permission under the “Collaboration” tab inside a study:
After successfully adding yourself as a collaborator, sign out of the “Lab Account” now and sign into your own individual researcher account. Here comes the magical moment: you should be able to see the new study listed under your own account now. Go ahead and open it, and try editing the study. It should work! This is how you would actually work on the study going forward – as a collaborator of the study on the lab account, instead of using the lab account directly.
If you have already created studies in your own individual account prior to creating the lab account, there are two methods for transferring your existing studies to the lab account:
- Method #1: Automatically, along with the entire recruitment history of your existing studies. This is the most convenient method for transferring studies, but it does require both the newly created “Lab Account” and your own individual account to have a paid subscription (either the Standard or the Pro plan will work).
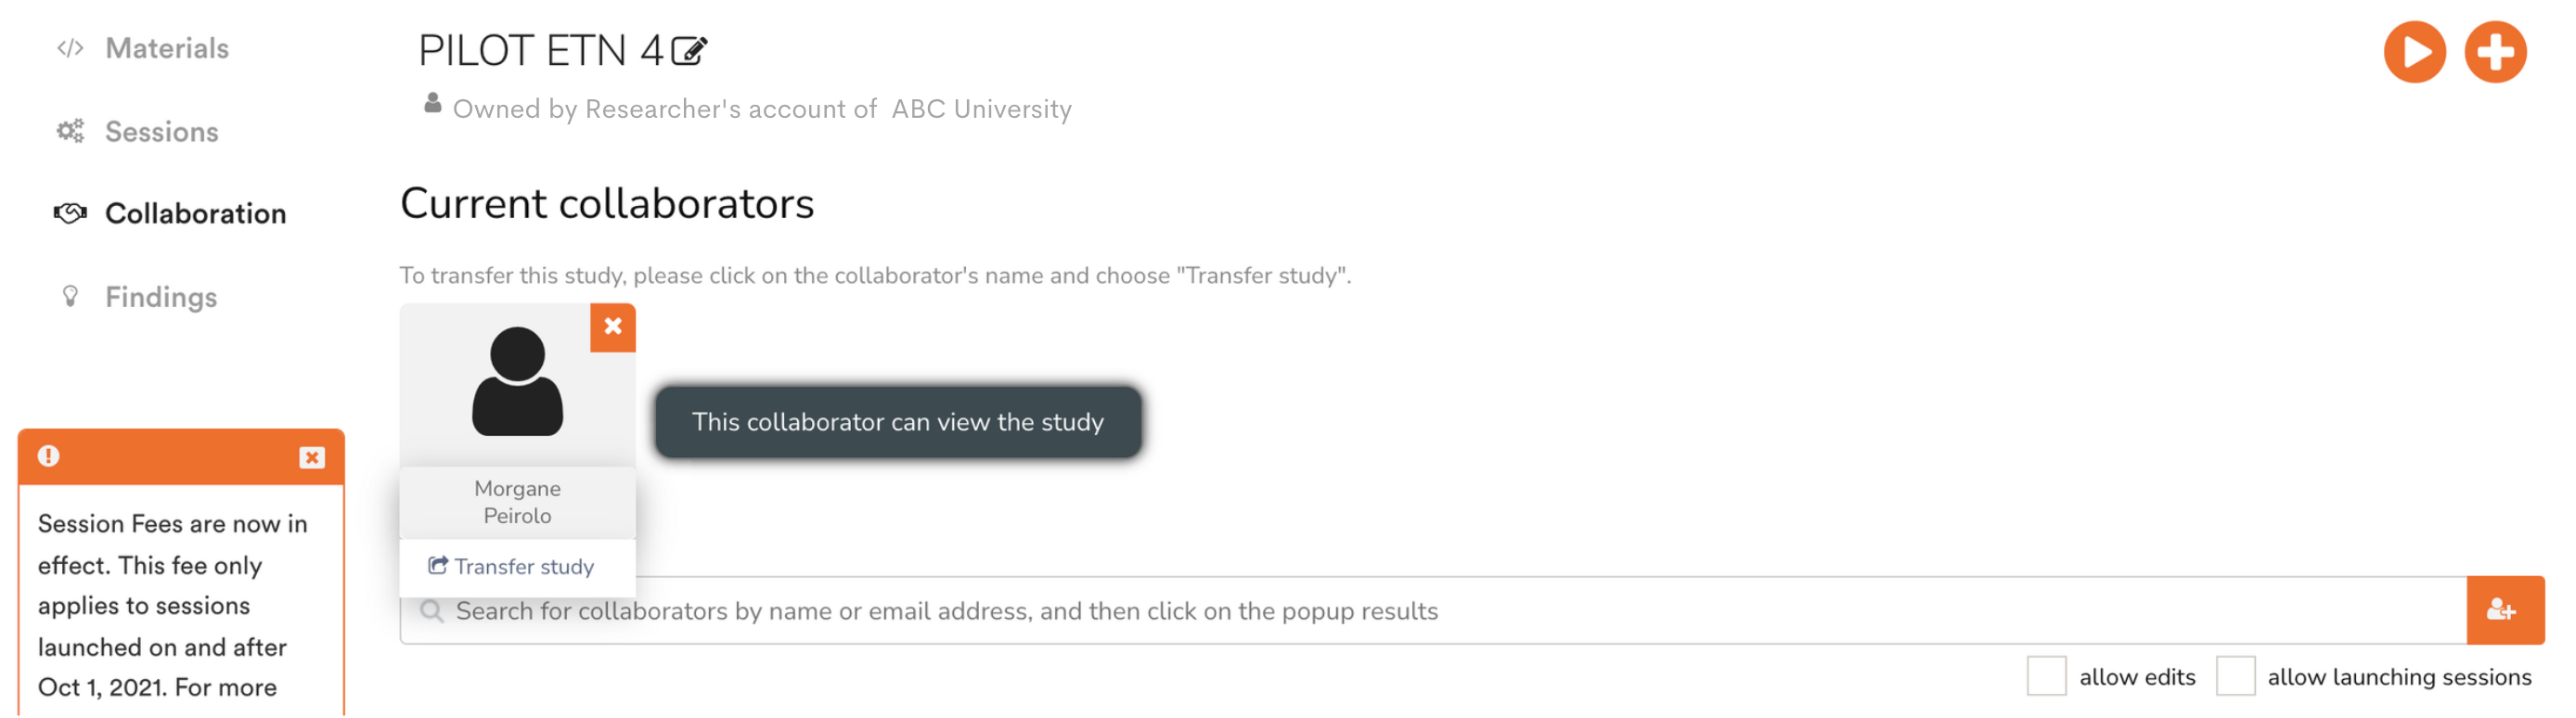
To do so, go to the Collaboration tab of your own study and add the newly created lab account as a collaborator. Once added, you’ll see a clickable button under the collaborator’s icon. Click the button and choose transfer the study to the collaborator (i.e., the lab account).
Now sign into the lab account again. You should see the study (still owned by your own researcher account) listed under “Research” -> “Studies”. But it should also say “incoming transfer pending”. Click “Accept” on behalf of the lab and the study will be successfully transferred to the lab account. Everything transfers, including all past sessions of this study and stimulus files used in your stimuli (if any).
Finally, now that the study is no longer your own, you may need to add yourself back as a collaborator so that you can still edit it under your account.
Perfect! Now that all studies are in the newly created lab account, we’ll cover how to run all your studies from the lab account in Step 3.
Step 3: Run studies from the lab account (with and without logging into the lab account)
Running studies from a centralized lab account has two major benefits: (1) all studies will appear as “Designed and run by the XXX lab”, sporting a unified and more formal identity, and (2) any potential cost of running participants will be incurred within a single account for easier cost management. In this step, we show you how to achieve exactly that.
The Recommended Method: Launching new sessions from your personal account as a collaborator. When a study in the lab account is ready for launch, the recommended method is to first add your personal account as a collaborator (importantly, with the permission to launch sessions) to the study (see Step 2). Then, to launch new sessions, you should log into your personal account, find the study, and create a new session.
The created new session will appear as “Designed and run by the ABC lab”. In addition, because the study is owned by the lab account, any resulting session fees or payment processing fees will also be generated under the lab account, instead of your personal account.
This method allows you to launch and manage studies without directly logging into the lab account (so as to avoid conflicts if multiple people sign into the lab account at the same time), and yet enjoy all the benefits of having a lab account.
Method #2 (Don’t do this unless you have to): Directly logging to the lab account. One alternative is that all the lab members can sign in to the lab account to create, manage and run experiments from there. We strongly advise against this because there are potentially unresolvable conflicts when multiple people try to edit the same study.
We hope this blog post is helpful in guiding you through the setup of your lab’s account on FindingFive. If you have any questions about managing your lab’s studies on FindingFive, please feel free to post your question to our Researcher Forum! Thanks!